Category Archives: Mailpiece Design

Personalization

This week we’ll examine the different ways you can personalize a mail piece to make it stand out more to potential customers. This can range from a simple “Hello John!” on a postcard mailing to matching personalized inserts to the name on an outer envelope, or even using a personal URL to link your mailpiece to your website in a more striking way.

[Note: Any mail containing personal information specific to the addressee must be sent First Class or Express Mail, not Standard Mail]

Printing something as simple as the person’s first name in larger print separate from the address will often draw attention and make your mail piece stand out from the rest of the mail in the mailbox. This can be done on the inkjet after the postcard is already printed, or the whole thing can be printed together on a digital press to allow for more options of color and style.

Another common option for personalization is to fill out known fields on a form to make it easier for the recipient to respond. You can fill in their name and address, and then leave a spot for corrections in case something has changed. The easier it is for the person to respond, the better response rate you will get.

Lastly, personalized URLs can be placed on a piece to get more traffic to your website. A personalized URL allows you to link the person to a web page designed specifically for them: different demographics can get different offers or have web pages styled differently within the same mailing. This serves a variety of purposes: it shows that your company keeps up with new technology, it drives traffic to your website, it allows you to track how well your mailing is doing, and it allows you to track who has responded, which we’ll touch on more next week.

That wraps up this week, have a great New Year’s Eve!

Mailpiece Design: Envelope Inserts

Happy Thanksgiving everyone!

Since it’s a short and likely busy week, we’ll keep our topic relatively light. Last week we mentioned envelopes, which are a great way to put together a fairly standard mailing without having to worry about too many postal regulations. This week we’ll examine what you can put in these envelopes.

One format we see often is a survey and return envelope. It’s a great way to see who’s actually interested in your product or service, and also find out more about them and their needs. Once you’ve put the letter together, you can supply an envelope for them to return the survey in. For a better response rate, you can have your mailer affix stamps to the return envelope or help you set up a Business Reply permit.

Another popular format is an addressed letter in a window envelope. This has the benefit of having a personalized letter, but without the downside of having to pay to have matching done between the letter and envelope. This format is very common for invoices and renewal notices. On these types of mailings, you can also have the addressed letter perforated to have a tear-off stub that the customer can return with their check to make processing easier.

If you have booklets already printed but they’re a little out of date, you can have them inserted in a 9”x12” envelope and then include a cover letter explaining any changes or updates. Some of our customers will preprint catalogs to get a good bulk printing rate, and then include one or more sheets with deals of the month or other specifics applicable to certain regions.

Lastly, never underestimate the power of a simple letter in an envelope. For letters that need to look professional, use a permit imprint or have it metered. If you want it to look more personal, have your mailer affix stamps instead. Everyone loves getting a letter in the mail!

If you’re traveling today, drive safe! There will be lots of traffic on the road!

Mailing Decisions: Letter or Flat

When designing a mail piece, the first decision you’ll need to make is whether to mail it as a letter or a flat. We’ll cover the differences between the two, and then give some examples of when each type of piece might be the appropriate choice.

Letters cover everything from 3 ½” by 5” by .007” thick postcards up to 6 ⅛” by 11 ½” by ¼” thick envelopes and mini booklets. Anything over this, up to 12” by 15” by ¾” envelopes, magazines, newspapers, and over-sized postcards, gets mailed as a flat. Automated letters provide the best postage rates possible. Non-automation letters (such as unsealed folded pieces) receive postal rates that are comparable to flats, and are only recommended in a few cases, mentioned below. Flats, while having higher postage rates, do have the advantage of being able to convey more information and be a more readily noticeable piece in a customer’s mailbox.

Letters are ideal for announcements that don’t require a lot of explanation: a store-wide sale, a monthly or yearly event people are already familiar with, or quick notice of change (e.g. a privacy policy change). These can be printed on a postcard-style piece, printed in a self-mailer, or enclosed in an envelope. Letters also work well for financial statements: invoices, tax bills, or vehicle registrations to name a few.

Non-automation letters are usually reserved for a very specific scenario (i.e. resident saturation mailings of menu-style pieces). In almost all other cases, it’s worth it to seal a piece with wafer-seals to get a substantial discount on postage. However, if you’re mailing at saturation rates (hitting every household in a carrier route or zip code), the savings in postage you’d get from sealing the piece likely won’t outweigh the cost of having the sealing done. We don’t often recommend designing a piece that doesn’t take full advantage of automation discounts, but since most people recognize the shape of a restaurant menu when they see it, it works very well as a mail piece. We also often have customers order extras on top of the mailing quantity so they can use them as take-out menus and get a better printing price for the larger quantity.

Finally, flats are a great choice when you have more information to convey. Magazines are a great way to keep your customers interested and informed of what’s happening in your organization. Catalogs and sales flyers give people a way to shop from home or bring people into your store. Flats also work well for sending out information to new customers or students: a car insurance company can send out a packet of new policy information or a college can send out a welcome packet of forms to fill out, informational booklets, school pride stickers, and more.

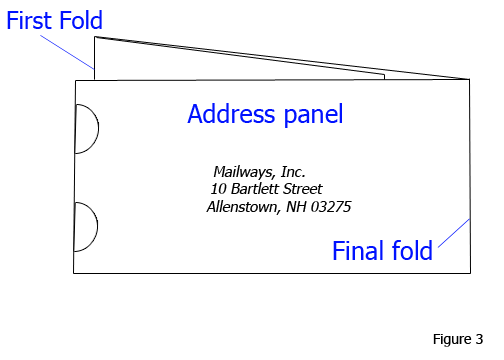
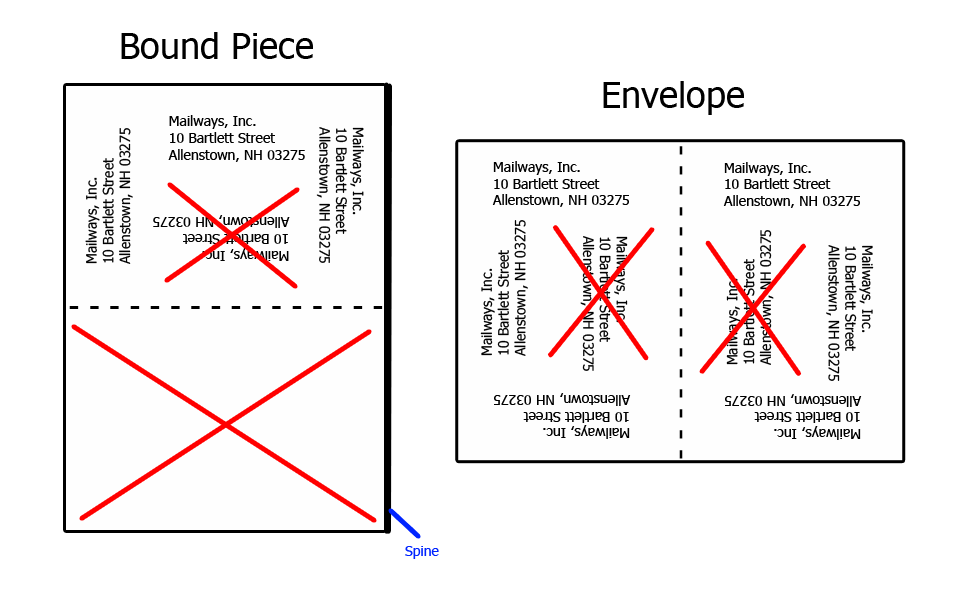
Before we finish up for the week, I’ll provide one warning about flats. Addressing requirements limit where you can place and orient the address on a flat, so please make sure any flat you design follows these rules:

On a bound piece, the edge considered the top is the edge at the top when the bound edge is oriented to the right (see bound piece below) when facing the address side of the piece. On an envelope, the top half is either of the shorter edges. Once you’ve determined the top, the address must be entirely within the top half of the piece, and must not be read upside-down in relation to the top edge. The images below show where the address may be placed on a bound or enveloped flat.

Flat addressing

When you’re ready to design your piece, give us a call! We can help you ensure that the piece is oriented correctly and eligible for all available postal discounts!

Welcome!

This is the beginning of our weekly series on mailing. Check back each week for useful topics which will help you avoid costly mistakes when planning a mailing or designing a mail piece. We’ll cover topics ranging from shapes of mail pieces and sealing methods to the actual messages and which type of mailing list might work best for you.

This first week we’ll jump right into a topic which often causes headaches for people who are new to mailing: folded self-mailers. A folded self-mailer is a style of mail piece where a sheet or multiple sheets are folded together and then wafer-sealed or glued to create a self-contained piece ready for mailing. They are great for advertising since they tend to be more eye-catching than a standard #10 envelope, but there are quite a few regulations to keep in mind when designing them. Orienting or sealing them incorrectly can result in additional postage cost or the piece not being mailable. We’ll keep things basic for now with a single sheet of paper folded and sealed. You’re not limited to these designs, but they’re a great starting point for a first-time mailer; always consult your favorite mailer or the USPS on any piece designs!

The most important thing which must be considered when designing a folded self-mailer is that the final fold must always be on the bottom or right edge of the piece when looking at the address panel. If the final fold is on the bottom and multiple folds are used, the last fold should form the back (non-address) panel to avoid needing extra wafer seals (figure 1). If the folds are done in two directions (quarter-folded), the first fold should form the lead (right) edge and the second fold should form the bottom edge (figure 2).

Figures 1 & 2

If the final fold is on the bottom and you’ve followed the rules above, your piece will only need two wafer seals on the top edge within 1” of the left and right edges to be eligible for all machinable and automation discounts (note: these simple standards are for the recommended 70 lb. paper stock; newsprint or other stock may require additional tabs). If the fold is on the lead (right) edge, the tabs will go on the trailing (left) edge within 1” of the top and bottom of the piece (figure 3).

Figure 3

The USPS now requires all tabs to be non-perforated but you still have the option of translucent wax tabs (easier to open) or clear plastic tabs (less noticeable on the piece). The tabs required are 1” diameter for pieces under 1 ounce and 1.5” for pieces over 1 ounce.

These designs should be enough to get a mailing started, so call us when you’re ready!